Groovyband Live! manages 4 input devices and 1 output device, all 5 devices must be connected to the computer through USB. If the computer does not have enough USB ports (as it might be the case with laptop or tablets) an USB hub can be used.
It is NOT recommended to use a Midi DIN cable connection, since the bandwidth (= connection speed) is too low to sustain the amount of data that needs to be transmitted.
Input devices serve both as keyboards to play the white/black keys (melody and accompaniment lines), and as physical controls to enter commands in addition to the touch screen or a mouse. For this latter purpose a set of bindings must be programmed.
A Yamaha MODX/Montage must be used as sound generator and configured as the midi out device. It can be, and usually is, used also as midi input. A single USB cable connecting the computer and the Yamaha synth then provides 1 input and 1 output. Please notice that to be properly recognized by Windows, the Yamaha synth needs a driver, to be downloaded from the Yamaha web site (link to download page). Download the "Yamaha Steinberg USB driver", it works for both MODX and Montage.
The setup is embarassingly simple:
In the Settings → Midi I/O panel just set the Midi In/Out to USB. Midi DIN cables are not supported since the connection is too slow.
In the Settings → Advanced panel just set the Bank Select and Pgm Change buttons to ON.
If you want to hear the audio from the synth's analog out jacks, in the Settings → Audio I/O panel you have switch on the Direct Monitor button. This button only shows when you connect the synth to a PC through a USB cable (which is needed to use Groovyband Live!).
If this button is OFF then you only get the audio to the PC through the USB cable.
If you want to use the panel buttons/knobs to trigger bindings (recommended), you have to display the Remote page and select the Plugin button.
Do NOT leave this page, otherwise your MODX/Montage bindings will stop working! This is only a Yamaha thing (= MODX/Montage's physical controls do not transmit midi messages anymore when you leave this page).
Bindings with other devices will continue to work as normal.
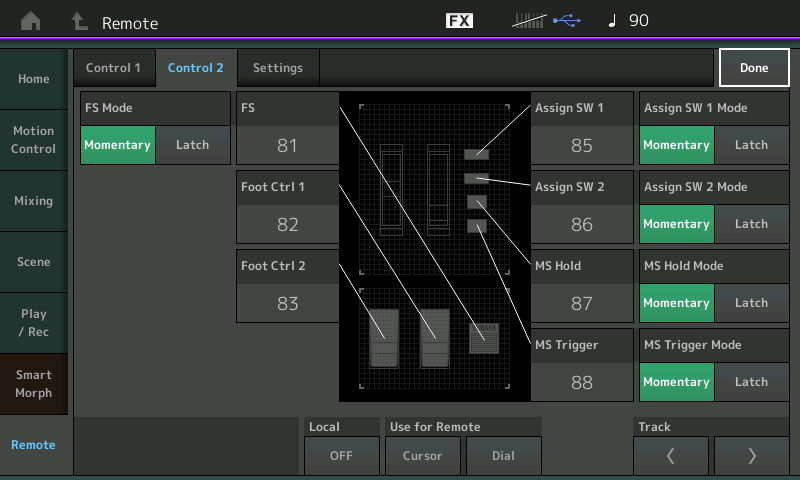
You might also need to set all the panel buttons and footswitch transmit mode as Momentary: check the Remote → Control 2 → Edit page.
As soon as Groovyband Live! can communicate with the MODX/Montage (see Groovyband Live! midi setup here below) it will send a series of sysex messages to setup everything else for you.
Basically (considering only the parameters that can be manually set through the synth's UI), if you want to troubleshoot problems (or revert to different values after using Groovyband Live!), what is needed is:
In Settings → Midi I/O, set Local control: Off.
Midi should go straight to Groovyband Live! without triggering any sound locally. It is Groovyband Live! that will later drive the tone generator.
In Settings → Midi I/O, set Midi sync: Midi.
It is Groovyband Live! that is in charge of establishing a tempo. The tone generator must follow, and obey.
In Settings → Advanced, set Midi I/O Mode: Multi.
You want the synth to respond to 16 midi channels as every other multi timbral expander out there (plain and simple), since the dawn of midi.
Groovyband Live! produces a stream of midi data that is converted into audio (sound) by the tone generator built in a MODX/Montage. Groovyband Live!’s midi “Out 1” port must therefore target the MODX/Montage you are using.
Groovyband Live! manages two keyboards + a pedal board (or a third keyboard) to play music.
The first keyboard is the one you use to play chord and lead voices (usually L/R1÷3), divided by a configurable split point. This keyboard is the one you set as midi “In 1”. It can be the same MODX/Montage used as sound generator, or any other keyboard.
The second keyboard is used for Aux voices (A1÷4), that you can set in split/layer mode as you like. This keyboard is the one set as midi “In 2”; it can be any keyboard you like, including the MODX/Montage, if it is not already used as “In 1”.
A third note input device (a pedal board or a keyboard) can be used to play Aux voices as well. This device is connected to midi “In 3”.
Every input (In 1÷4) can be used to connect midi devices (generically called “control surfaces”) that provide physical controls (knobs, sliders, switches, …), possibly in addition to keys.
Common scenarios
To recap, three common setups are the following (many others, not depicted, are possible):
Only the MODX/Montage is used. This is set both as “In 1” and “Out 1”. You play its keyboard in split mode (as you would normally in an arranger). Aux voices cannot be played since there is no another keyboard/pedalboard connected.
The MODX/Montage and another keyboard are used. You still set the MODX/Montage as “Out 1”, and then you decide which keyboard to configure as “In 1” or “In 2”. You play the chords and lead voices on “In 1”, the aux voices on “In 2”.
A midified organ console provides inputs for 2 manuals and pedalboard. The MODX/Montage is only used for sound generation (and possibly as control surface).
This configuration uses the MODX/Montage’s keyboard for chord recognition and L/R lead voices, and an optional keyboard/pedalboard to play Aux voices.
This configuration uses the second keyboard for chord recognition and L/R lead voices, and the MODX/Montage’s keyboard (+ optional pedalboard) to play Aux voices.
An organ console provides inputs for both manuals and pedalboard. The MODX/Montage is used for sound generation, and optionally can be connected to Input 4 and work as control surface.
Connected devices, if not “class compliant”, might need a driver. Check with their respective user manuals.
Control surfaces
If you have other midi devices (keyboards, control surfaces) that you want to use to input Groovyband Live! commands with physical controls (to augment mouse and touch screen operations) you can connect them to midi “In 3” and “In 4”.
For details about what commands can be addressed, what are the supported midi messages, and how to bind midi hardware to midi Groovyband Live! commands, please refer to the Bindings setup chapter.
Midi Ports panel
Press the MIDI PORTS button to toggle the visibility (show/hide) of the Midi Ports panel. This button flashes if either Input 1 or Output 1 are not configured. They are mandatory to be able to use the program.
Press RESCAN MIDI I/O DEVICES every time a new device is connected or turned on. If in doubt, just press it, it will not hurt!
Repeatedly press the device selector buttons in order to select the device you desire for the given midi input/output port. The list is cycled circularly: if you missed an entry, keep pushing until it shows again.
If you do not see your device, even after having rescanned the midi I/O, then you have to troubleshoot your midi connection so that it is properly recognized by Windows.
You could also try to restart the program.
Optionally select the channel to listen to (it must correspond to the transmit channel). See next point.
If you go past channel 16, an asterisk (*) will be shown. This means “any” channel.
For simple (and most common) setups this is the setting to use (most resilient to unwanted changes) when you do not know/care what channel the midi device is transmitting on.
Check the input/output midi traffic through this led. If the led flashes then Groovyband Live! is receiving/transmitting data on this port/midi channel combo.
Press the PANIC button if some note is stuck due to lost data in the connection between the computer and midi device. This is a safety net which nowadays is rarely, if ever, used.
Problems troubleshooting is a methodical task. If you want to solve the problems as soon as possible with no frustrating guessing, please follow this list in order. Do NOT assume anything. Verify each step before advancing to the next.
Start checking that Groovyband Live! is receiving midi data in input port "In 1".
Play some notes on the connected keyboard: in the Midi Ports panel you should see the traffic led flashing. If this is not the case then you have a problem with your device and/or midi driver (or maybe you have just selected the wrong midi device or midi channel).
Before going on you have to solve this.
Now, still playing notes on the connected keyboard, check that the level meters on the Mixer are moving. A moving meter means that Groovyband Live! is sending data to the midi out.
You could also try selecting a style and start the automatic accompaniment. As a bare minimum this should play a drum track (other tracks will only play if you key in a chord).
If you do not see the (undimmed) volume meters going up and down, then you should check you have enabled the track(s). To know if a track is enabled or not you may check this section.
Now check that the midi traffic led next to Out 1 port is flashing. If this is the case that means that Groovyband Live! has delivered the midi data to Windows, which now is in charge to dispatch the data to a physical device, through a midi driver.
Then you can check if the midi data is arriving to the MODX/Montage's tone generator (connected to "Out 1" port).
Press the "Performance (Home)" button on the MODX/Montage front panel. You should see the mixer with all the strips and corresponding volume meters. Pressing the green "View" button on the touch screen you can change the mode in order to cycle through all the 16 tracks.
If midi is arriving in one of the tracks you should see the volume meter bar moving. Since in principle you do not know what midi channel (= part/track) the data is being transmitted on, you should check them all!
If the midi data is not arriving, then you should check your device and/or midi driver (or maybe you have just selected the wrong midi device).
When all else fails
If nothing seems to work, then try this one.
Try to use your MODX/Montage with an entirely different program. For example a DAW. Can you make it work with that program?
Can you send midi data to the DAW? Can you receive midi data from the DAW and produce some sound?
Of course for all this to be meaningful it has to happen on the same machine you have installed Groovyband Live!
If not even another completely different program can communicate with your MODX/Montage, then the problem should reside within your computer or physical device. Often this is an issue with a proprietary driver.