Groovyband Live! manages 4 input devices and 1 output device, all 5 devices must be connected to the computer through USB. If the computer does not have enough USB ports (as it might be the case with laptop or tablets) an USB hub can be used.
It is NOT recommended to use a Midi DIN cable connection, since the bandwidth (= connection speed) is too low to sustain the amount of data that needs to be transmitted.
Input devices serve both as keyboards to play the white/black keys (melody and accompaniment lines), and as physical controls to enter commands in addition to the touch screen or a mouse. For this latter purpose a set of bindings must be programmed.
A Yamaha PSR/Tyros/Genos must be used as sound generator and configured as the midi out device. It can be, and usually is, used also as midi input. A single USB cable connecting the computer and the Yamaha arranger then provides 1 input and 1 output. Please notice that to be properly recognized by Windows, the Yamaha arranger needs a driver, to be downloaded from the Yamaha web site (link to download page).
All the actions detailed here must be performed in the Function/Midi Setup menu of the arranger (please refer to your arranger’s manual for details on how to get there).
Do not be worried: these are “do it once and forget” actions, since the resulting configuration can be saved and recalled when needed at the push of a button!
The screenshots below are for the PSR-S/Tyros arrangers. For Genos and PSR-SX, although the user interface is different, the available functionality is identical and it is straightforward to figure out how to operate on those arrangers as well.
Every Yamaha arranger can receive midi data (and play it) on 2 midi ports, each one of 16 midi channels.
Port1 is used by the arranger’s internal midi player, and is the preferred choice to be used from external sequencers as well to drive the arranger’s sound generator engine (= to use the arranger as a sound expander).
Port2, although also accessible from the outside, is used by the arranger internal style play engine (accompaniment parts, ots, pads). It is less suitable for general use, since it does not recognize some midi commands which are vital to properly use the sound generator at its full potential from an external sequencer.
Groovyband Live! acts as an external sequencer that needs full control over the Yamaha arranger’s tone generator, and hence Port1 must be used.
Midi configuration
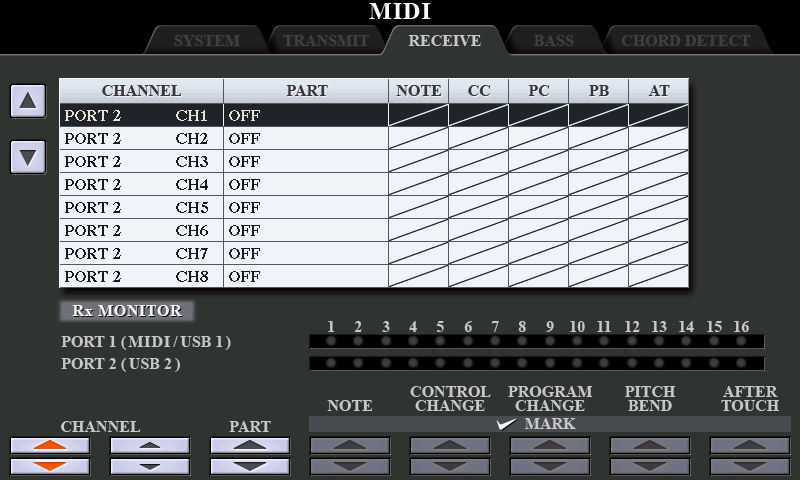
To setup Port1 as outlined above, enter the Midi Receive menu and set all Port1 parts (channels 1÷16) to “song” and all Port2 parts (channels 1÷16) to “off” (the display must be scrolled down to access all ports/channels):
Additionally you want the Yamaha arranger to transmit the whole key bed (white and black keys) as a single flat block of keys, all on the same midi channel. By default the arranger would transmit the various left / right parts on different midi channels, plus other additional midi data which is useless for our purpose.
To silence all the midi data you do not want, and consolidate the whole key bed on a single midi channel, you have to set the Midi Transmit menu as shown (all parts set to “off” except the Upper and Lower parts, which must transmit to Port1/Channel1; once again scroll down the display to access all parts).
To avoid duplicate messages, deselect CC and PB transmission for the Lower part (keeping them only for the Upper part):
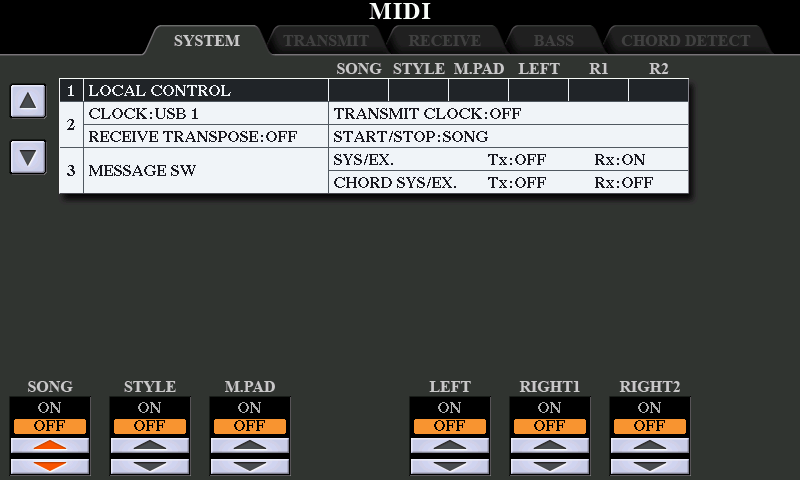
Then you want to disable as much “local control” as possible, so that your (maybe unintended) “button pushing” on the arranger would not trigger unwanted midi commands locally (bypassing the control of Groovyband Live!). To obtain this you have to set the Midi System menu as follows:
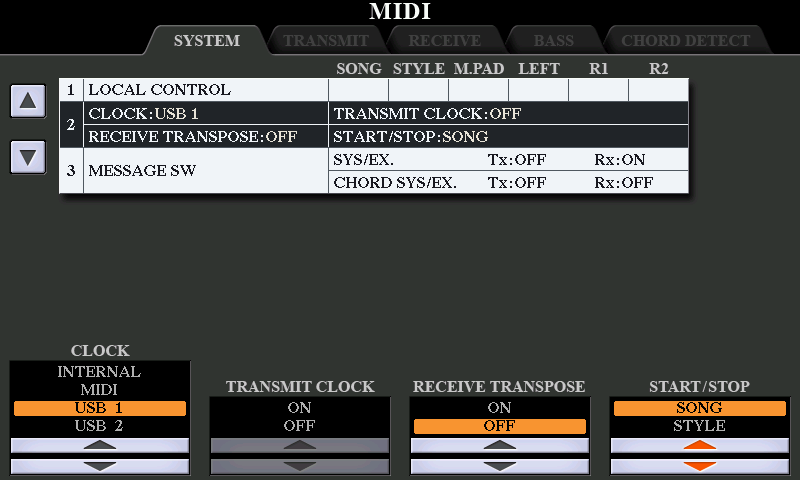
You also have to instruct your arranger to follow the external MIDI clock coming from USB Port1 (the one Groovyband Live! will transmit on) instead of its own internal clock:
Finally, select which MIDI messages should be received (receiving SysEx messages is vitally important):
Important note
Unfortunately Yamaha’s midi implementation is not flexible, and does NOT allow you to disable all local control. Registration and OTS buttons, not only do not transmit useful midi data to be used for other purposes, but they also always function with “local control”.
This will cause an unwanted side effect: they reconfigure the DSPs to Port2 channels (used by the internal style playing engine), making them instantly disappear from Port1 midi channels (used by Groovyband Live!).
If you press those buttons by mistake while performing with Groovyband Live! you might notice a sudden dropout of DSP processing on your channels (accompaniment / lead / aux).
To recover from this situation you have to enter the Midi Ports panel and press the Panic button on the midi out port: this will immediately reset the tone generator and reestablish the control over the disputed DSPs. Your Groovyband Live! music performance will seamlessly continue (= the sequencer will go on as nothing had happened, without losing “the beat”). You will only notice a volume dropout for a fraction of a second, this is the price to pay to reset the sound generator.
Anyway, it is better to prevent problems rather than cure them: do NOT press OTS and Registration buttons on Yamaha arrangers while performing with Groovyband Live!
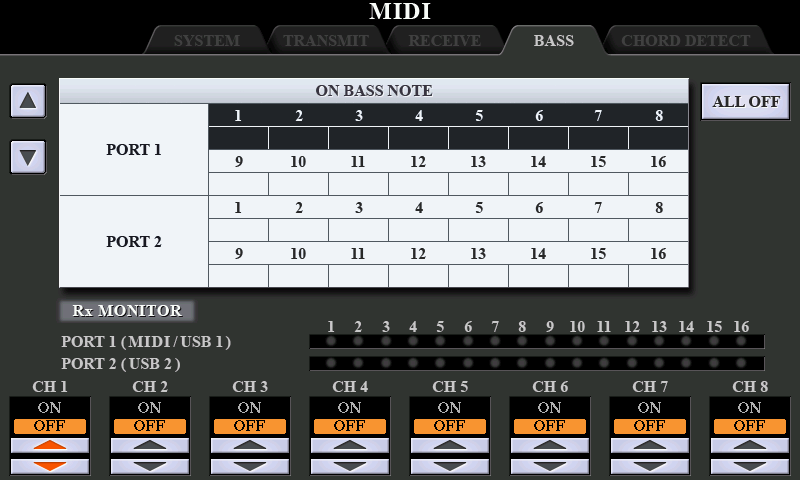
Before saving, check that all the settings in the following screenshots are disabled:
Save midi configuration
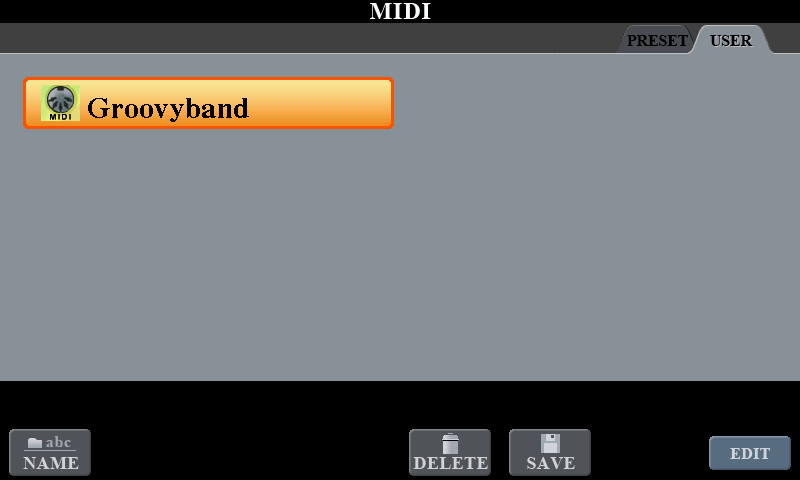
To forget all this setup and never do it again, you have to save it as a user configuration (maybe you need to consult your arranger manual). Give it a proper name so that you can instantly find and recall it when needed:
BEWARE: If you do not save it, everything is lost at power down. Next time you switch on your arranger you have to do it once again from scratch! Not recommended!
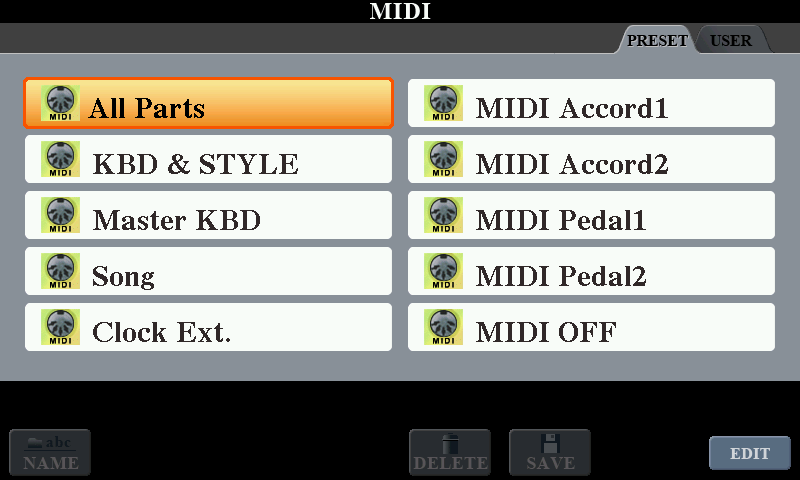
If you want to revert to use your arranger “normally” (= without Groovyband Live! being in control) you can easily do it, by recalling one of the default midi configurations (or your own customisation, if any):
Misc settings
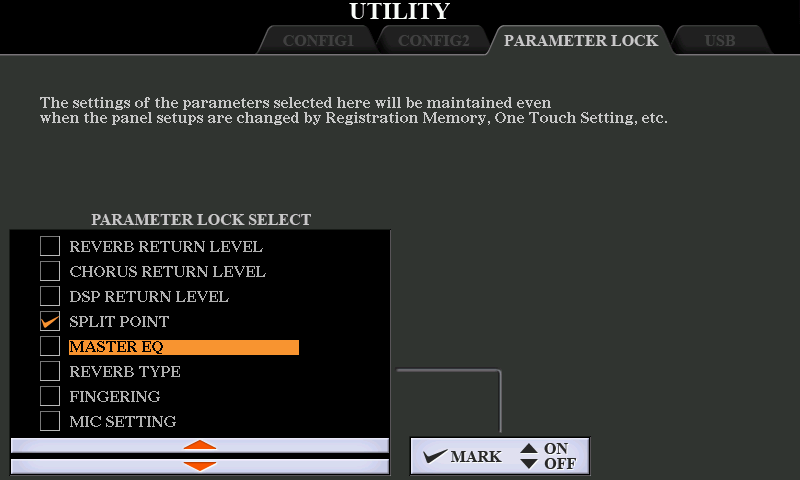
Additionally, to let Groovyband Live! control the Master EQ and other settings, you have to uncheck the boxes in the Utility/Parameter Lock screen for these entries:
Reverb Return Level
Chorus Return Level
DSP Return Level
Master EQ
Reverb Type
Compressor settings
To “glue” together all the mix parts and punch the overall loudness to optimal levels without destroying the dynamics, we suggest the following compressor settings (adjust to taste), suitable for the volume of our supplied preset styles and for playing them at their best:
Threshold offset: -12
Ratio offset: +3
Gain offset: +5
Do not forget to save them as a user preset! Otherwise they will be lost when powering down the keyboard.
Misc and Compressor settings are NOT saved with the Midi configuration. If you change them, you have to remember to set them again!
Groovyband Live! produces a stream of midi data that is converted into audio (sound) by the tone generator built in a Yamaha arranger . Groovyband Live!’s midi “Out 1” port must therefore target the Yamaha arranger you are using.
Groovyband Live! manages two keyboards + a pedal board (or a third keyboard) to play music.
The first keyboard is the one you use to play chord and lead voices (usually L/R1÷3), divided by a configurable split point. This keyboard is the one you set as midi “In 1”. It can be the same Yamaha arranger used as sound generator, or any other keyboard.
The second keyboard is used for Aux voices (A1÷4), that you can set in split/layer mode as you like. This keyboard is the one set as midi “In 2”; it can be any keyboard you like, including the Yamaha arranger , if it is not already used as “In 1”.
A third note input device (a pedal board or a keyboard) can be used to play Aux voices as well. This device is connected to midi “In 3”.
Every input (In 1÷4) can be used to connect midi devices (generically called “control surfaces”) that provide physical controls (knobs, sliders, switches, …), possibly in addition to keys.
Common scenarios
To recap, three common setups are the following (many others, not depicted, are possible):
Only the Yamaha arranger is used. This is set both as “In 1” and “Out 1”. You play its keyboard in split mode (as you would normally in an arranger). Aux voices cannot be played since there is no another keyboard/pedalboard connected.
The Yamaha arranger and another keyboard are used. You still set the Yamaha arranger as “Out 1”, and then you decide which keyboard to configure as “In 1” or “In 2”. You play the chords and lead voices on “In 1”, the aux voices on “In 2”.
A midified organ console provides inputs for 2 manuals and pedalboard. The Yamaha arranger is only used for sound generation (and possibly as control surface).
This configuration uses the Yamaha arranger ’s keyboard for chord recognition and L/R lead voices, and an optional keyboard/pedalboard to play Aux voices.
This configuration uses the second keyboard for chord recognition and L/R lead voices, and the Yamaha arranger ’s keyboard (+ optional pedalboard) to play Aux voices.
An organ console provides inputs for both manuals and pedalboard. The Yamaha arranger is used for sound generation, and optionally can be connected to Input 4 and work as control surface.
Connected devices, if not “class compliant”, might need a driver. Check with their respective user manuals.
Control surfaces
If you have other midi devices (keyboards, control surfaces) that you want to use to input Groovyband Live! commands with physical controls (to augment mouse and touch screen operations) you can connect them to midi “In 3” and “In 4”.
For details about what commands can be addressed, what are the supported midi messages, and how to bind midi hardware to midi Groovyband Live! commands, please refer to the Bindings setup chapter.
Midi Ports panel
Press the MIDI PORTS button to toggle the visibility (show/hide) of the Midi Ports panel. This button flashes if either Input 1 or Output 1 are not configured. They are mandatory to be able to use the program.
Press RESCAN MIDI I/O DEVICES every time a new device is connected or turned on. If in doubt, just press it, it will not hurt!
Repeatedly press the device selector buttons in order to select the device you desire for the given midi input/output port. The list is cycled circularly: if you missed an entry, keep pushing until it shows again.
If you do not see your device, even after having rescanned the midi I/O, then you have to troubleshoot your midi connection so that it is properly recognized by Windows.
You could also try to restart the program.
Optionally select the channel to listen to (it must correspond to the transmit channel). See next point.
If you go past channel 16, an asterisk (*) will be shown. This means “any” channel.
For simple (and most common) setups this is the setting to use (most resilient to unwanted changes) when you do not know/care what channel the midi device is transmitting on.
Check the input/output midi traffic through this led. If the led flashes then Groovyband Live! is receiving/transmitting data on this port/midi channel combo.
Press the PANIC button if some note is stuck due to lost data in the connection between the computer and midi device. This is a safety net which nowadays is rarely, if ever, used.
But sometimes, even the unthinkable happens!
Note for Yamaha arrangers
When selecting a Yamaha arranger as midi device, you normally want to address its midi Port1 (as explained here).
The exact name of this Port depends on the driver, it is usually something like “Digital Keyboard-1”. We agree with you: it is not immediate to associate “digital keyboard” with your Yamaha arranger. You should blame Yamaha: this is how they announce to the world (= Windows) their name.
In order to be certain to have selected the correct port, you have to test the General Volume Knob in the Groovyband Live! main screen. If it works, then you have selected the correct port, otherwise you should try with the other one.
In fact Port2 does NOT respond to the general volume midi commands, only Port1 does.
Problems troubleshooting is a methodical task. If you want to solve the problems as soon as possible with no frustrating guessing, please follow this list in order. Do NOT assume anything. Verify each step before advancing to the next.
Start checking that Groovyband Live! is receiving midi data in input port "In 1".
Play some notes on the connected keyboard: in the Midi Ports panel you should see the traffic led flashing. If this is not the case then you have a problem with your device and/or midi driver (or maybe you have just selected the wrong midi device or midi channel).
Before going on you have to solve this.
Now, still playing notes on the connected keyboard, check that the level meters on the Mixer are moving. A moving meter means that Groovyband Live! is sending data to the midi out.
You could also try selecting a style and start the automatic accompaniment. As a bare minimum this should play a drum track (other tracks will only play if you key in a chord).
If you do not see the (undimmed) volume meters going up and down, then you should check you have enabled the track(s). To know if a track is enabled or not you may check this section.
Now check that the midi traffic led next to Out 1 port is flashing. If this is the case that means that Groovyband Live! has delivered the midi data to Windows, which now is in charge to dispatch the data to a physical device, through a midi driver.
Then you can check if the midi data is arriving to the Yamaha arranger 's tone generator (connected to "Out 1" port).
Open the Midi/Receive configuration tab in your arranger. There is a midi Rx (receive) Monitor with flashing leds for each channel: when a midi message is received on that Port/Channel the led briefly flashes. You should be looking at Port1 (MIDI/USB 1) input channels.
If the midi data is not arriving, then you should check your device and/or midi driver (or maybe you have just selected the wrong midi device).
When all else fails
If nothing seems to work, then try this one.
Try to use your Yamaha arranger with an entirely different program. For example a DAW. Can you make it work with that program?
Can you send midi data to the DAW? Can you receive midi data from the DAW and produce some sound?
Of course for all this to be meaningful it has to happen on the same machine you have installed Groovyband Live!
If not even another completely different program can communicate with your Yamaha arranger , then the problem should reside within your computer or physical device. Often this is an issue with a proprietary driver.