Sequencer control

General concepts

The automatic style accompaniment engine (the sequencer) is driven by the chords you play. Chords are recognized when played on the left of the split point on the main keyboard (the one connected as “In 1”, see Midi ports setup). Lead voices are played on the right of the split point.

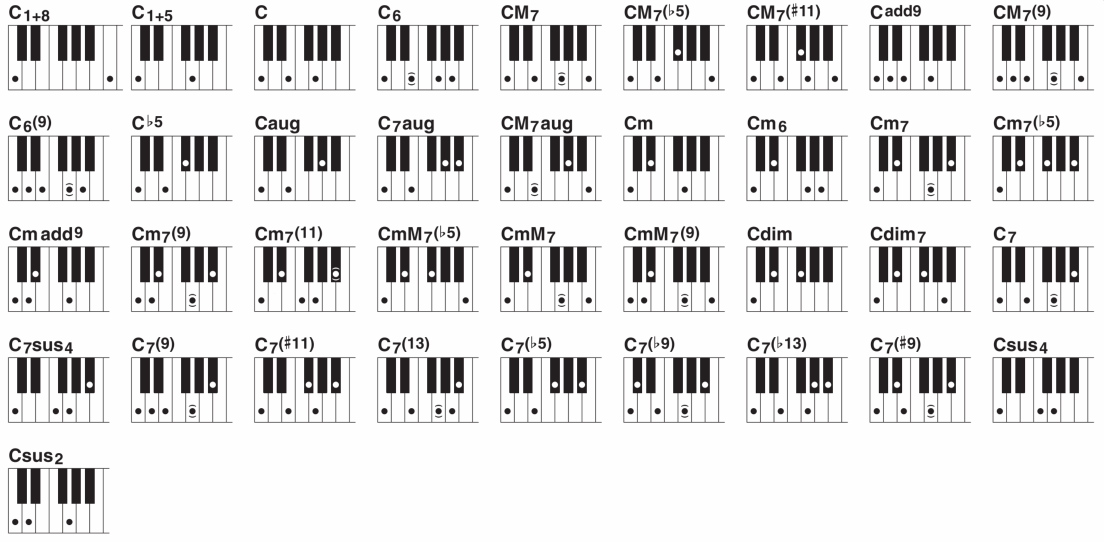
A chord is recognized when a minimum of 2 notes are played at the same time, the full list of recognized chords is presented below.

The split point is configurable, and has two modes: fixed or smart. Explained later. It can be deactivated so that you can play the lead voices for the whole keyboard width, but you lose the ability to input chords.

The bass part played by the sequencer can play with the lowest note always matching the root of the chord (whatever inversion you have played), or tracking the chord inversion actually played. In experienced hands, this second mode allows for more expressive bass lines and is the one selected by default.

You can decide whether the full accompaniment should continue to play even when you raise your left hand (default mode) or stop, with only the drum parts still playing.

Finally you can sync the start and/or stop of the whole sequencer (drum + instrumental parts) with your chords playing.

Sequencer control panel.
  1. Switch on (button highlighted) or off the split point. Additionally, as second function (detailed in the box below), you can set the position of the split point.

  2. Displays the recognized chord (if any). The recognized chords and corresponding fingering are detailed below.

  3. Fixed/smart split mode indicator. You can toggle between the two modes by right clicking (long pressing) the chord display. In fixed mode nothing is shown.

  4. Toggles bass inversion on/off. When on, the automatic accompaniment produces different bass lines according to the chord inversion actually played.

  5. Toggles auto accompaniment parts hold. If on (the usual setting), you can raise your left hand and have the accompaniment keep on playing as nothing had happened. If off, as soon as you raise your left hand (no more keys pressed) all the accompaniment parts, except drums, will stop.

  6. Manually starts and stops the sequencer (auto accompaniment). If no chords are keyed in, only the drum parts will play.

    If you want all the parts to start together, you are better served with the SYNC START function (see next point).

  7. When SYNC START is enabled, the sequencer is stopped and ready to start as soon as you press at least one key on the left of the split point. You usually want to trigger a whole chord (at least 2 keys played all together), so that you have the whole band (drums + instrumental parts) start playing.

    Once the sequencer has been started, the button disengages automatically.

    You can optionally select persistent engagement (the SYNC START will return active when the sequencer stops).

    To (de)activate (= toggle) persistent engagement right click the button. When this function is active the button color turns more orange (visual feedback).

  8. When active, SYNCRO STOP will stop the whole sequencer (drums + instrumental parts) as soon as no more keys are pressed on the left of the split point (= when you raise your left hand).

    At the same time, SYNC START will be activated; so that you can restart the accompaniment by simply playing a chord again.

    This function is better used sparingly for special effects. The normal way to stop the sequencer is through the START/STOP button, or through an Ending (see Conductor), which automatically stops the sequencer as well.

Split point position setting

To set the position of the split point:

  • Right click (long press) the SPLIT button. The led starts flashing and the currently shown split point has a question mark added at the right.

  • Press a key on the keyboard configured as “In 1”. The key is the lowest note you want to play as R1÷4. The led stops flashing and the (new) split point note is shown on the button.

Split mode

Two split modes are supported:

  • Fixed mode. This is the mode usually supported by every arranger. All the notes equal to or on the right of the split point are played as lead voices (R1÷4). The notes on the left of the split point are used for chord detection (and are possibly used to play the L1÷3 voices).

  • Smart mode. This mode is unique to Groovyband Live! If you only play notes equal to or on the right of the split point, then this is like Fixed mode.

    If you play at least one note on the left of the split point, then the lowest note is taken as reference, and the split point is dynamically moved 15 semitones above the reference note (but never higher than the set split). As soon as the reference note changes, the dynamic split point is updated accordingly. See later a practical example.

Why is Smart mode useful?

Since the span of a stretched left hand usually never exceeds 15 semitones, you can play chords normally as you are always used to. If the played chord is to the far left of the keyboard then the reference note (the leftmost of your chord) + 15 semitones might still be below the set split point. By considering this lower position as the dynamic split, you gain “right hand keys” useful to play lead voices even below the set split.

So when you temporarily need more range for lead voices in the low registers, you might deliberately play chords on the far left of your keyboard and gain additional room for your right hand melody line.

But wait! There is more:

If you play a single note (the lowest of your keyboard) you will not trigger any chord change (at least 2 notes are needed for that) but you will lower the dynamic split point at its extreme, thus gaining the maximum range for lead voices. This technique (which can be blindly applied in a snap without disrupting your harmony) is sometimes useful to temporarily extend (maybe even only for a couple of notes) the range of available right hand keys.

Let’s see a practical example of Smart Split in action:

Smart Split mode in action.
  1. This is the fixed split point (set at, say, C3). It is nominally the lowest playable note for lead voices.

  2. These are the keys normally available for chord recognition (when Fixed Split is active), and hence cannot be used to play lead voices.

  3. We play a C major chord at the far left with Smart Split active. The reference note is therefore C1 (the lowest played note).

  4. The dynamic split is C1 + 15 semitones: Eb2. It is unlikely in normal playing you can stretch your left hand so high, while keeping pressed the C1.

  5. This is the additional range gained for lead (right hand) voice playing. While holding the C major chord depicted at point [3] (or even only the lowest C1), you can play right hand voices starting from Eb2.

    Be careful: if you release your left hand the split point will revert to C3.

Recognized chords

The following chords are recognized. Optional keys are shown with a dot between vertical brackets.

Fingering of recognized chords.

Additionally, there are some shortcuts you can activate with only 2 keys. They are shown below for the key of C:

2 keys chord fingering.

To activate a 2 keys shortcut, you have to press the base key (C2 in this example) + another key (red dot). The resulting chord is shown linked with the red dot.

This picture at first sight might seem impossible to remember. The fact is that you don't have to! It is enough to play 2 notes by instinct and let Groovyband Live! figure out the right chord. This picture just documents the "reasoning" the computer takes to infer the corresponding chord.

Chord cancel

Pressing three adjacent keys of your choice (i.e.: C-C#-D, E-F-F#, …) will cancel the current chord. The automatic accompaniment parts will therefore be silenced, except the drum and percussion parts that will continue to play.